Headless Widget Integration Guide
Headless implementation of the ShoppingGives widget on an e-commerce website.
Who should read this:
The webmaster or developer with HTML/CSS -level access to the e-commerce website.
Pre-Integration
-
Please request your Store ID from your ShoppingGives representative to render all ShoppingGives widgets.
-
To facilitate our support, please invite [email protected] to your development environment.
Overview
To integrate the ShoppingGives widgets, the Global Tracking Script must be included on every page. Secondly, you must include the ShoppingGives widgets on corresponding site pages depending on your use case:
a. Show the ShoppingGives widget in your Product Page (PDP)
b. Show the ShoppingGives widget in your Shopping Cart and/or Checkout Page (Pre-Conversion)
c. Show the ShoppingGives widget as a Thank-you Page (Post-Conversion)
You can customize the look & feel of all widgets by updating the ShoppingGives Styles (see section Styles and Customization)
Now, you must decide how to notify the ShoppingGives backend to process a sale and its corresponding potential donation, see the Sale Webhook section.
Once all these pieces of code are added to the e-commerce website, the new implementation can be tested.
Note
If you use a Content Management System to manage your e-commerce website, check with your ShoppingGives rep for a CMS-specific implementation guide. This guide describes a general integration approach and does not take any CMS specifics into account.
Global Tracking Script
Make sure the following script section is included on every page in the header tag of your site:
<script type="text/javascript" src="https://cdn.shoppinggives.com/cc-utilities/sgloader.js?sid=XXXXXXXXXX&test-mode=true"></script>
The parameters available for the "sgloader.js" script are:
| Param | Type | Description | Required | Default |
|---|---|---|---|---|
| sid | text | Store ID - Provided by ShoppingGives | Yes | n/a |
| test-mode | bool | Toggles test mode on, turn to true while testing | No | false |
Product Page (PDP Page)
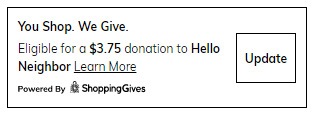
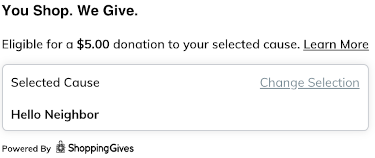
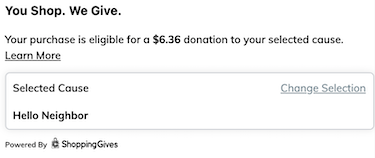
- Choose the style of widget you would like to use
a. Contained (https://cdn.shoppinggives.com/cc-utilities/contained-product.js)

b. Compact (https://cdn.shoppinggives.com/cc-utilities/compact-product.js)

c. Full (https://cdn.shoppinggives.com/cc-utilities/full-product.js)

- Craft the Widget's URL Parameters
| Param | Type | Description | Required | Default |
|---|---|---|---|---|
| sid | text | Store ID - provided by ShoppingGives | Yes | n/a |
| price | text | Price of the current subitem | Yes | n/a |
| subitem-id | text | Identifier of the current subitem | Yes | n/a |
| target-element | text | CSS Selector value where you want the widget to be placed. | No | If none is provided, it replaces the script tag with the widget HTML |
| after | bool | Append after target-element | No | false |
| before | bool | Append before target-element | No | false |
| debug | bool | Allows to turn on debug logging for the widget | No | false |
Reminder
Remove all optional URL Params that are not being used.
- Place the widget on the product pages
<!-- TEMPLATE -->

<script type="text/javascript" src="https://cdn.shoppinggives.com/cc-utilities/{product-widget-style}.js?sid={store-id-provided}&price={price-of-item}&subitem-id={identifier-for-specific-product-variant}"></script>
<!-- EXAMPLE -->

<script type="text/javascript" src="https://cdn.shoppinggives.com/cc-utilities/contained-product.js?sid=ab123456-c78d-9ef0-g1h2-345i678j90k1&price=98.76&subitem-id=SUBITEM123"></script>
Note
If a product has multiple variants (e.g. size, color, etc.) but the subitem ID is not defined yet, populate the “subitem-id” parameter with the first variant’s ID.
- Handle updating of subitem on the page
a. On subitem change, run:
window.sgProductControllers[0].setSubitem('{subitem-id}', {price});
window.sgProductControllers[0].setSubitem('SUBITEM123', 98.76);
- Confirm that the donation amount shown on product pages changes dynamically based on the product value.
Cart / Checkout Page (Pre-Conversion)
- Choose the style of widget you’d like to use:
a. Contained (https://cdn.shoppinggives.com/cc-utilities/contained-cart.js)

b. Compact (https://cdn.shoppinggives.com/cc-utilities/compact-cart.js)

c. Full (https://cdn.shoppinggives.com/cc-utilities/full-cart.js)

- Create a hidden CSS Element “amount” to target for dynamic donation on cart and checkout.
Note
Disregard this section if there is an entity already with a similar calculation or other uses like, for example, affiliate tracking.
The CSS element named “amount” is the term used to describe line items' currency value minus discounts, pre-tax, and pre-shipping (this is the currency value that ShoppingGives calculate donations based on).
For example, with a $100.00 subtotal and 10% off coupon, $4.99 Shipping, and $3.00 tax, the “amount” would be $90.00
- Craft URL Params
| Param | Type | Description | Required | Default |
|---|---|---|---|---|
| sid | text | Store ID - Provided by ShoppingGives | Yes | n/a |
| target-element | text | CSS Selector value where you want the widget to be placed. | No | Replaces script tag with widget HTML |
| after | bool | Append after target-element | No | false |
| before | bool | Append before target-element | No | false |
| debug | bool | Allows to turn on debug logging for the widget | No | false |
Reminder
Please remove all the optional URL Params that are not being used.
- Place the widget code on the cart/checkout pages
<!-- TEMPLATE -->

<script type="text/javascript" src="https://cdn.shoppinggives.com/cc-utilities/{cart-widget-style}.js?sid={store-id-provided}"></script>
<!-- EXAMPLE -->

<script type="text/javascript" src="https://cdn.shoppinggives.com/cc-utilities/contained-cart.js?sid=ab123456-c78d-9ef0-g1h2-345i678j90k1></script>
- Add Cart Items
Add cart items to the window.cc_cart_items javascript variable when an item is added. A cart item is a javascript object that includes the following fields: id, price, quantity, and discount.
<!-- TEMPLATE -->

if (!window.cc_cart_items) { window.cc_cart_items = [] }

// Foreach Item
window.cc_cart_items.push({ id: '{itemId}', price: {price}, quantity: {quantity}, discount: {discount} });
<!-- EXAMPLE -->

if (!window.cc_cart_items) { window.cc_cart_items = [] }

// Foreach Item
window.cc_cart_items.push({ id: 'SUBITEM123', price: 98.76, quantity: 3, discount: 10.00 });
a. When adding an item, refresh all the ShoppingGives cart controllers as in the following example.
if (window.sgCartControllers) {
   for (var x = 0; x < window.sgCartControllers.length; x++) {
      window.sgCartControllers[x].refreshCart();
   }
}
b. On a cart item change event (item removed, quantity changed, etc.), refresh all the carts to render the widgets properly.
c. Once the cart page is loaded and the
cc_cart_itemsarray javascript window variable is populated, verify the cart controllers have anullvalue. If any of the cart controllers have a NOT null value, then call therefreshCart()function to update its current state.d. Handle Cart Discount updates – You can update discounts by applying them to each product and ignoring the cart level discount.
if(window.sgCartControllers) {
   for (var x = 0; x < window.sgCartControllers.length; x++) {
       window.sgCartControllers[x].setDiscount({cart discount});
   }
}
- Confirm the donation amount shown on the cart and checkout pages is dynamically changing based on the value of the cart, pre-tax, pre-shipping, and post-discounts.
Thank-you page (Post-Conversion)
-
Check CMS Specific documentation. CMS steps may vary based on specific CMS requirements. Please request your specific CMS integration guide if you have not received it.
-
Add Url Params to https://cdn.shoppinggives.com/cc-utilities/conversion.js
| Param | Type | Description | Required | Default |
|---|---|---|---|---|
| sid | text | Store ID - provided by ShoppingGives | Yes | n/a |
| oid | text | Order ID. It must be the same as the webhook sends | Yes | n/a |
Please remove all optional URL Params not being used
- Place the widget on the confirmation (like a thank-you or any other post-conversion) page
- Call the function: window.clearSession() to reset the tracking id after the order is placed.
Styles and Customization
You can use the CSS editor to customize the appearance of our widget with any style sheet. It is better to make the customization on the theme’s main style sheet.
To edit the container to add padding, target main-element.
Style Fields for the Compact Widget Style:
-
To modify the eligibility tag main text, target class id sg-main-text to provide the stylings (don't forget to use the
!importantkeyword to override our default definition) -
If you have to fix the logo size, target class id powered-by-logo
Style Fields for the Contained Widget Style:
-
To modify the eligibility tag description, target class id sg-text-wrap to provide the stylings (don't forget to use the
!importantkeyword to override our default definition) -
To modify the main title, target the id cc-shop-give to provide the stylings (don't forget to use the
!importantto override our default definition) -
If you have to fix the logo size, target class id powered-by-logo
Style Fields for the Full Widget Style:
-
To modify the main title, target the id sg-title to provide the stylings (don't forget to use the
!importantto override our default definition) -
To modify the eligibility tag description, target class id sg-text-wrap to provide the stylings (don't forget to use the
!importantto override our default definition) -
If you have to fix the logo size, use class id sg-powered-by-wrap
Sale Webhook
Please reference your specific CMS integration requirements:
- Shopify Plus Integration Guide
- BigCommerce Post Conversion Integration Guide
- Magento 2 Integration guide
- Salesforce Commerce Cloud (SFCC), the ShoppingGives cartridge facilitates the integration process with SFCC by installing transfer "jobs" to deliver orders and products updates to the ShoppingGives backend
- ETL Data Transfer Process, send a CSV file with a schedule to process all sales orders, products updates, and returns
- Direct Custom API, you can implement direct API calls from your backend to notify sales to our ShoppingGives backend. A relevant endpoint example call is the POST Sales @ https://sales.api.shoppinggives.com/. Some of these endpoints require the ShoppingGives tracking ID that you can get from the Session Storage variable named
sg.sid-{store ID}and its value is encoded with a Base64 algorithm (populated by the global ShoppingGives script).
Testing the Integration
Note: When Testing
Ensure that the
test-modeURL parameter on the global tracking script is set to “true”.
- Running a 1% donation on a test purchase – Expected outcome:
a. Make a Test Purchase: Take note of the donation amount listed and cause supported before checkout.
Confirm the donation amount shown pre-purchase on the widget is 1% of the amount (pre-tax, pre-shipping, post discount)
b. Post-conversion: After a successful conversion the customer will be shown the post-conversion share modal. Use this modal to verify the correct donation amount and cause are displayed.
Confirm the donation amount shown post-purchase on the modal is 1% of the amount (pre-tax, pre-shipping, post discount), and the same amount shown pre-purchase
c. Testing with Coupon Code: Repeat step “a.” with the use of a coupon code that updates the price of the order. Ensure that the donation amount dynamically updates before the purchase is completed and that the donation amount post-purchase reflects the same amount shown pre-purchase.
-
Check for z-index, global typeface, and padding settings to display the widget optimally
-
Remove “True” from the Global Tracking script URL to turn off test mode before activating the application
Updated almost 2 years ago
