Manual Widgets Integration
Overview
This guide provides a comprehensive overview of manually integrating the Clearity by ShoppingGives widget into your online store. This process involves several key steps, from pre-integration requirements to configuring settings for your Product, Cart, Checkout, and post-purchase pages.
Before you begin your integration, let's review how the widgets function and render on your site.
With Clearity, your widgets will dynamically render based on the segments and rules you specify on a campaign. Widgets will display and update the donation and cause details dynamically based on whether the customer meets the segment and product rules you have set based on following the requirements below.
Four (4) main components drive the setup of your widgets.
- Global Widget Script
- The Global Widget Script is used to drive the core of the experience by capturing the data needed to identify the customer segment, capturing event data for analytics of the campaign, rendering the corresponding widget experience, and, most importantly, creating a Tracking ID in your session storage that connects the dots between our system.
- Configuration Windows Variables
- The sgConfig is a window variable that contains data that will need to be provided by you for each customer session. This core data powers the unique experiences through our Widgets and gets updated multiple times through a single session.
- Window Functions
- Windows functions are leveraged when updates are made on the product, cart or checkout pages to ensure our widget has the correct information to render. These functions work in conjunction with the sgConfig.
- Widget Divs
- The Widget Divs are the target elements provided in the Clearity portal for specifying where the widgets are rendered on your Product, Cart, Checkout, and Post Purchase pages. The Widget Divs will render based on the Global Widget Script and be populated based on the sgConfig data and function updates.
Pre-Integration
- An Entity ID is required from ShoppingGives to render your widgets. You can obtain your Entity ID in the ShoppingGives portal under API Credentials. An Entity ID is your unique store identifier.
- To fully utilize campaigns including creating rule sets based on specific products or collections and activating customer donation campaigns, you'll need to connect your product data with our system under "Products" in the Clearity portal. Reference Products API.
- Ensure a campaign is created & published in the Clearity portal for testing purposes.
1. Placing Your Global Widget Script
First thing to do is place the Global Widget Script in your website's main tag across all pages .
This is required to properly capture the customers' segment, place them in the correct campaign upon site visit, and update their segment and campaigns throughout the customer journey.
<script type="module" async type="text/javascript" src="https://cdn.clearity.com/js/latest/impact-widget.js"></script>
2. Setting up the window variable sgConfig
Create a window variable named sgConfig on your site with the following fields.
The widget runs off this window variable and depends on its up-to-date accuracy to correctly display donation amounts and cause information.
Two primary functions will be required after you update the sgConfig:
- window.sgProductsUpdated() - This function tells your widget that the products array on the sgConfig has been updated and to pull down the most recent changes and update itself.
- window.validateSegments() - This function is only required to be called if segment values are not available during widget initialization when segments are evaluated automatically. If the segment values update after the widget is fully loaded, then this function is required to be called so the widget knows to re-evaluate segments. Reference iSegment below to determine if the function is required.
sgConfig properties:
| Param | Type | Description | Required |
|---|---|---|---|
| id | string | Your entity ID, retrieved from your account manager or through your Clearity portal | true |
| siteName | string | Store name | true |
| siteDomain | string | Store URL | true |
| testMode | bool | Allows for testing of the widget without creating real donations. | false |
| debug | bool | Prints debug logs to the dev console to help with troubleshooting. | false |
| platform | number | Manual = 1 | true |
| reloadOnAddOnOrRoundUpChange | bool | Some CMS's require the cart to be reloaded to show newly added items. AddOn and RoundUp are direct donation products that show in the cart. If you want the page to reload when they select one of these donations so it appears in the cart. Toggle this on. (This does not affect store donation on purchase). | false |
| products | IProduct | This must be updated on every product page load when a product variant changes and when the cart and checkout pages load or change. When you update this field with the current products, you will call window.sgProductsUpdated(), and our widget will pull it down and update the widget. | true |
| metadata | IMetadata | The MetaData within the sgConfig is used to update and dynamically set the widget experience to the user. Reference the segments definitions. | true |
<!-- Example settings of config values. -->
<head>
  <script>
    window.sgConfig = {
      id: "xxxxx-xxxx-xxx-xxxx-xxxxxx",
      testMode: false,
      debug: true,
      platform: 1,
      reloadOnAddOnOrRoundUpChange: false,
      products: [
        {
          groupId: "12361289736";
          id: "547";
          price: 6,
          quantity: 1,
          sku: "red-1",
        }
      ],
      metadata: {
          addOn: [{id: xxxxxxxxx, value: 1}, {id: xxxxxxxxx, value: 3}, {id: xxxxxxxxx, value: 5}, {id: xxxxxxxxx, value: 10}], // cms variant or sub item id
          roundUp: 'productId',
          pageType: 2,
          language: 'fr' // french
          segment: {
            ipAddress: '192.158.1.38'
            cartValue: 49.99
            customerTags:loyalty, vip, silver, high-churn
          }
      },
    }
  </script>
</head>
IMetadata
Below is our interface for the metadata in the sgConfig. The widget expects data to be configured as such to reference the correct customer donation variants, values, page details, and segment values:
| Meta Data | Definition | Values |
|---|---|---|
| addOn | The Customer Add-On donation Product IDs you created on your store and their corresponding value. | id: string, value: number |
| roundUp | The Customer Round-Up donation Product ID you created on your store | id: string |
| segment | Manually populate segment values as defined in the iSegment. | See Segments Interface |
| currency | For display purpose our widget standard is USD. If you are leveraging localization for currencies, you can set the "Active Currency" code which will dynamically display the donation amount based on our stored values of USD or CAD. By providing the Currency three letter code e.g 'CAD' it will dynamically populate the conversion. If you are leveraging additional localization for currencies with a 3rd party app or want to override our currency rate, you can do so by providing the Currency Code and Currency Conversion Rate as a numeric percentage. For example, if USD and a donation value of $1, and your user session was in Canada, the conversion rate value could equal ".80". Note, that the conversion rate displayed may have a variation from the actually donation amount created at the point of order processing as noted in our Terms and Conditions. The final donation amount created will always equal the value set in the campaign in your primary currency (currently USD or CAD). | currency.rate, currency.active, |
| language | To render your widget to a language other than English 'en' you can provide the ISO 639-1 (two-letter code). | ISO 639-1 (two-letter code) |
| pageType | You must provide the pageType if you do not have dedicated page paths set in the admin portal. | Home = 0, Product = 1, Cart = 2, Checkout = 3, Order Confirmation = 4 Other = 5 |
ISegment
Leverage the window.validateSegments() function if the segment values update after the initialization of the Global Widget Script.
| Segment | Definition | Segment Value | Value Type |
|---|---|---|---|
| Session countries or regions, Session states or provinces, Session cities, Zip Code / Post Code | User session Country or Region, based on IP address of session. Use if manual override is preferred or the public IP is not provided or the location IP is known. | ipAddress | string |
| Customer Tags | Customer tags the Merchant provides from your CMS, CRM, ESP, or other 3rd party locations. | customerTags | comma separated strings |
| Cart total | The cart total is provided with a function call in the sgConfig on page load or cart update. | cartTotal | number |
Initializing the Segments Refresh
Note, that while the Data Layer and Windows Variables for segments are not leveraged in the sgConfg, if either update after the Global Widget Script initialization, then the window.validateSegments() function needs to be called.
IMetadata
interface IMetadata {
  addOn: IAddOn[],    // If you have AddOn enabled, these are the product IDs you created on your store
  roundUp: string,    // If you have RoundUp enabled, this is the product ID you created on your store
  pageType: PageType, // Required only if you do not have dedicated paths for products/cart/checkout/order-confirmation
  language: string,   // Optional if you want the widget translated to other than English. ISO 639-1 (two-letter code)
	currency: {         // Optional if you are a currency other than "USD"
    rate: number,     // Rate against "USD"
    active: "CAD"
  },
	segments: ISegment
}

interface IAddOn {
	id: number | string,
  value: number
};

interface ISegment {
  ipAddress: string,
  cartValue: number,
  customerTags: string
}

enum PageType {
  Home = 0,
  Product = 1,
  Cart = 2,
  Checkout = 3,
  Order Confirmation = 4
  Other = 5
}
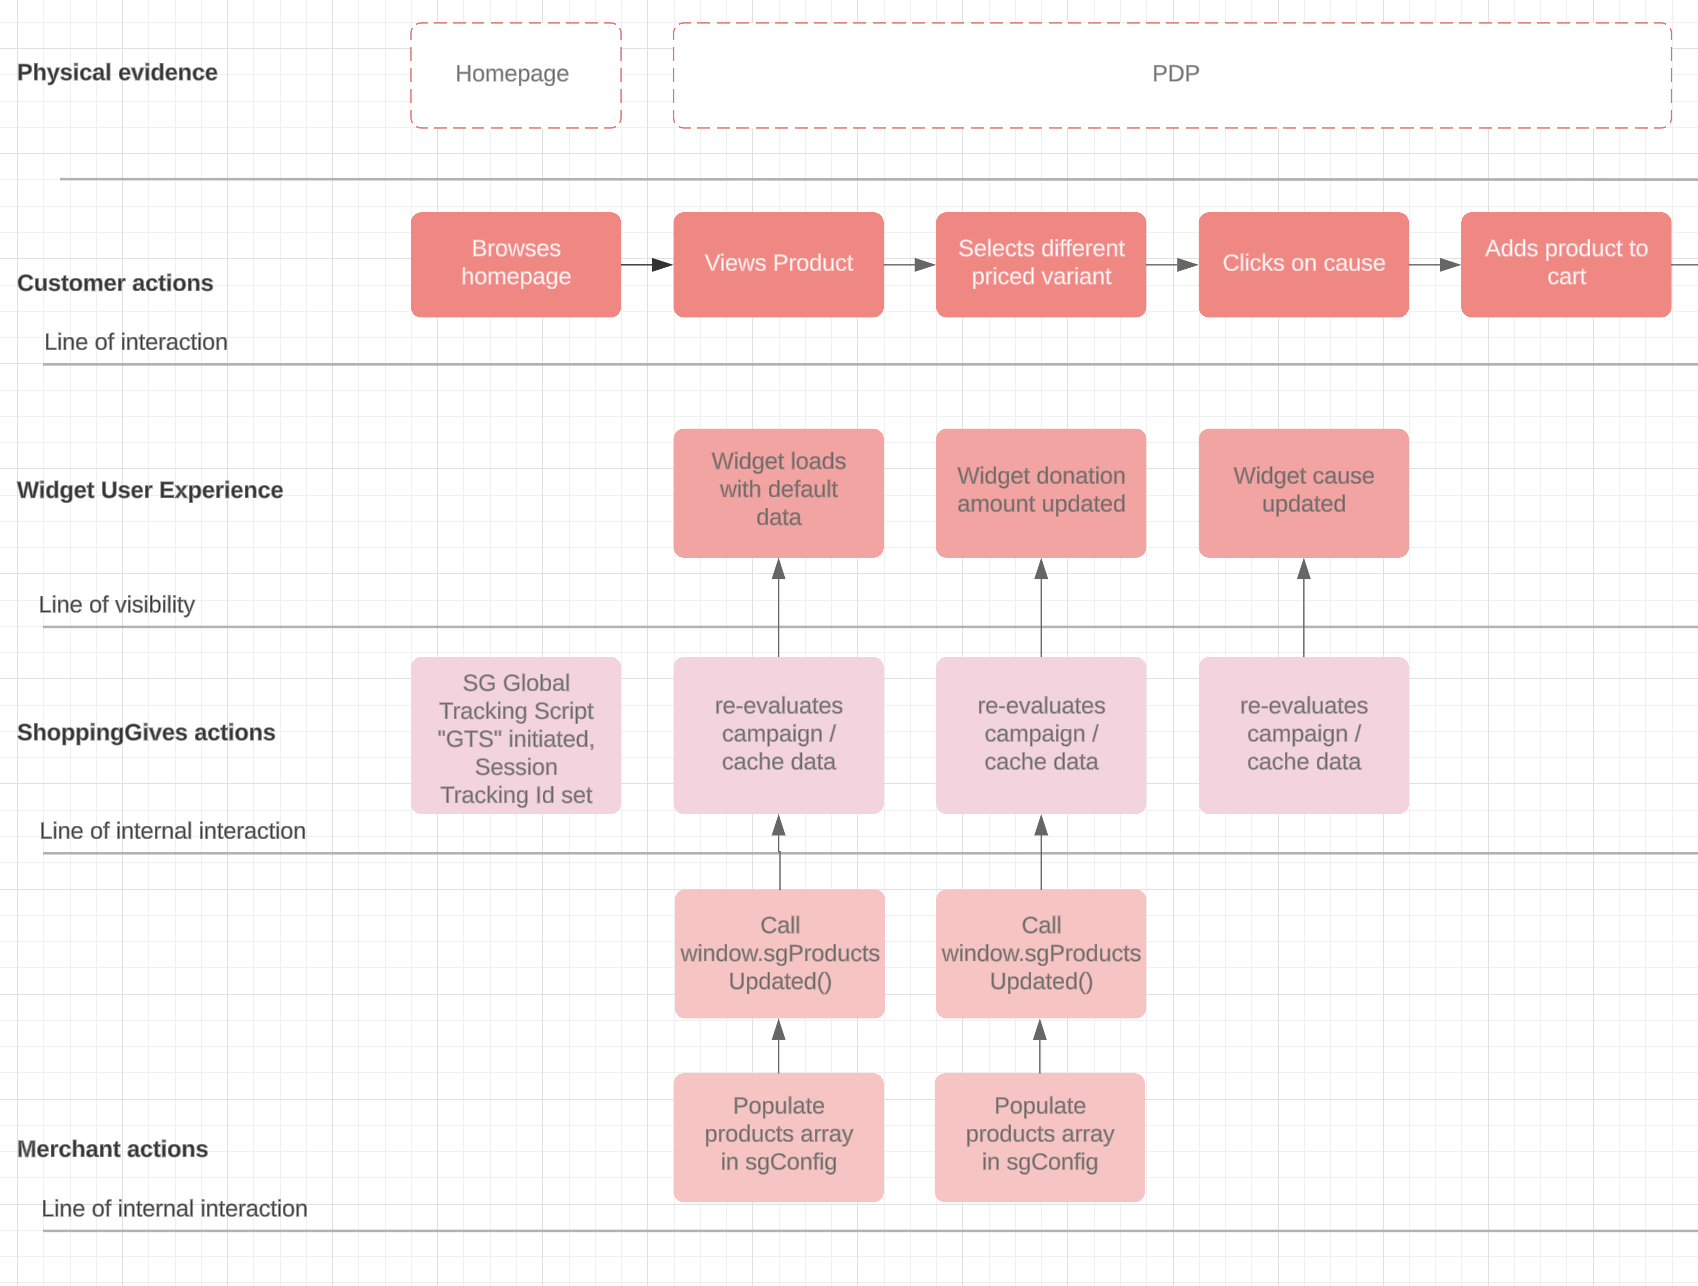
3. Setting up your Product Page
First, integrate your PDP widget with your website by injecting the product page widget div near your add-to-cart button. You can retrieve your PDP Page widget div from the Integrations --> E-commerce section of your Clearity portal.
Next, to power your widget with the correct information, you must perform the two steps below each time the product page is visited, a page refresh occurs, or the product variant updates.
- Update the products array in the sgConfig
- Call the window.sgProductsUpdated() function.
Here are some use cases that would call for you to perform both of those steps each time on the product page:
- A shopper visiting a product page
- A shopper selecting a different size
- A shopper increasing the quantity of products before adding to a cart
- A shopper logging into their customer account, triggering a page refresh
Below is the interface for the products in the sgConfig. The widget expects data for each product to be configured as such to display the correct donation value and cause details:
IProduct
interface IProduct {
    groupId: string;
    price: number; // Final price after all discounts
    quantity: number;
    sku: string;
    id: string;
}
4. Setting up your Cart/Checkout Page
First, integrate your Cart and Checkout widgets with your website by injecting the Cart and Checkout widget divs into your online store. You can retrieve your Cart and Checkout widget divs from the "Integrations", "E-commerce" section of your Clearity portal.
Next, to power your widget with the correct information, you must perform the two steps below each time the cart or checkout page is visited, a page refresh occurs, or the products in the cart update in any way, including discounts or product quantities being updated.
- Update the products array in the sgConfig
- Call the window.sgProductsUpdated() function.
Below are some use cases that would call for you to perform both of those steps each time on the cart or checkout page:
- A shopper visiting the cart or checkout page.
- A shopper applies a coupon to the cart or checkout page.
- A shopper increases or decreases the number of items in the cart.
- A shopper adds a customer donation to the cart (see details below).
Setting up Customer Donations
If you'd like to invite your shoppers to join you in giving, you can set up a customer donations in your campaign to let them do that. Follow the steps below to get set up:
- Create 4 Customer Donation Products in your CMS. Each product should have a unique SKU. The donation value can be any value you prefer if a single donation does not exceed $249.00 based on regulations. We recommend $1, $3, $5, and $10
- Customer donations should be excluded from discounts, as 100% of the customer donation value will always be donated.
- Your customer donations will appear as line items in the cart, along with your customer's order receipts. Their order receipt from you is considered their donation receipt.
- If you do not want to accept refunds on customer donations, please configure your CMS to ensure these products are non-refundable and note this in your user experience if so.
- Please consider the downstream impact on fulfillment with your OMS or ERP. If possible, set the customer donation SKUs as auto-fulfilled within your CMS.
- When creating these products, ensure that inventory is not tracked and no tax is charged on the customer donation products.
- If possible, set the customer donation products as digital within your CMS.
- Configure your customer donations:
- From "Pre-Integration, Step 2," Sync your customer donation products into our product catalog.
- Go to your Clearity Portal → Settings → Products and select the Customer Donation products you created in Step 1
- Click Actions > Set as Customer Donation
- Next, create two functions in your CMS called addCustomerDonationToCart and removeCustomerDonationFromCart
- These functions will reference the variant IDs provided in your sgConfig.metadata.addOn and sgConfig.metadata.roundUp.
- When a customer clicks on a customer donation in the widget, the widget will call the addCustomerDonationtoCart function and pass it the corresponding variant ID that you provided in the sgConfig.metadata.
- Your function then adds the customer donation to the cart and returns a promise to the widget, letting it know whether the donation was successfully added or not.
- If a customer removes the Customer Donation from the cart by either deleting the product or clicking on the widget to unselect the customer donation, repeat the same steps for the removeCustomerDonationFromCart function
| Functions | Parameters | Response |
|---|---|---|
| addCustomerDonationToCart | variantId: string, quantity: number | Promise: { success: true/false } |
| removeCustomerDonationFromCart | variantId: string, | Promise:{ success: true/false } |
5. Access and store your sg-tracking ID with your sales data
To correctly convert your sale to the preferences of your campaign during a shopper's session, you'll need to access and store the sg-trackingId with each sale. The sg-tracking ID is required to be provided with the Order via either the Sales API or Sales ETL requirements. We suggest storing this in your order metadata or additional attributes that can be referenced downstream in your order management system to be provided with the order to ShoppingGives.
- Retrieve the sg-tracking ID by using this function:
| Functions | Parameters | Response |
|---|---|---|
| sessionStorage.getItem('sg-tracking') | String | Base-64 encoded string: {sg-tracking Id} |
Cross-Domain Tracking
If your website leverages a headless framework with separate domains pre-checkout vs checkout, you will need to capture the Tracking Id upon session creation and persist the Tracking Id at check in order for our widgets experience to sync between domains.
Depending on your cross-domain storage patterns, ensure you capture the 'sg-tracking' Id and place it back into the session storage value within the 'sg-tracking' at checkout.
6. Setting up your Post-Purchase
A donation confirmation is required on the order confirmation screen after an order is placed and a donation is created.
To configure your Donation Confirmation, place this script in the head of your post-purchase page. This will only need to be done once. This script leverages the cached cause and donation information to populate the embedded post-purchase widget.
<script async type="text/javascript" src="https://cdn.clearity.com/js/post-purchase-modal.js"></script>
Testing your Widget Integration
In the sgConfig, you'll notice two other params that you can utilize when testing your widgets. Both of these params are set to false by default but can be set to true to activate the below actions:
testMode: When set to true, any donations made while testMode is set to true will not generate pledged donations. This is a great feature to use if you want to test your donation journey end-to-end without needing to process a refund on an order so donations aren't truly pledged by your business. We recommend using this in your development/sandbox environments.debug: When set to true in your sgConfig, the developer console will print debug logs to help you with your troubleshooting.
You can also activate the debug logs by following the following steps:
- Going to your browser and open the developer console.
- Go to Application > storage, expand the Local Storage, find your store domain under local storage.
- Under Key, type in
shoppinggives-debug. - UnderValue, type in
true. - Go back to the Console in the developer console.
- Reload the page that the widget Div is placed on.
- Upon reload, ShoppingGives Debug logs will populate.
Updated over 2 years ago